If you're looking to breathe new life into your home this weekend, you might want to contemplate tackling a few DIY projects that can make a significant impact without requiring extensive time or resources. From rejuvenating your kitchen with a stylish backsplash to creating a unique herb planter for your garden, there are plenty of options to explore. Each project offers a chance to express your creativity and improve your space in practical ways. Curious about which projects can truly transform your home? Let's explore the possibilities together.
Essential Insights
- Transform your space by using leftover wallpaper to create unique wall accents or cover outlet covers for a fresh look.
- Refresh your kitchen with a new backsplash by installing peel-and-stick tiles for a quick and easy upgrade.
- Frame your bathroom mirror for a stylish update by using wood pieces and construction adhesive for a custom look.
- Build a fold-up workbench to maximize your workspace, ensuring efficient organization for your DIY projects.
- Create a charming garden arbor using durable materials, providing a beautiful focal point for your outdoor space.
Transform Your Space With Wallpaper

Wondering how to refresh your home without a complete makeover? Transforming your space with wallpaper can be a game-changer. Start by using leftover wallpaper to create unique wall accents like Danish stars for your fireplace mantle or any other decorative spot.
You can also decorate outlet and switch covers with wallpaper that either matches or complements your room's theme, making those small details pop. Additionally, customizing outlet and switch covers not only enhances aesthetics but also showcases your personal style.
If you're looking for a quick and stylish update, consider lining your drawers with wallpaper for a durable, wipeable liner that adds both texture and character.
Don't forget about your refrigerator; covering it with leftover wallpaper gives it a unique and personalized touch that brightens up your kitchen.
For a more creative twist, try making your own DIY wallpaper using stencils and Sharpie paint markers. This less messy method allows you to achieve various patterns while being quick to apply.
Just make sure you use quick strokes to avoid any paint bleeding.
Jazz up the back of a bookshelf with wallpaper to add depth and interest, or cover light switch and outlet covers to tie the room together seamlessly.
You can even decorate picture frames with wallpaper for a personal touch.
With so many options, you can easily elevate your home's aesthetic using wallpaper, making it a fun and rewarding weekend project!
Refresh Your Kitchen Backsplash

A kitchen backsplash can dramatically enhance your cooking space, adding both style and functionality. If you're looking to refresh your kitchen, this project is perfect for the weekend. Here's a simple guide to get you started:
- Choose Your Tile Selection: Decide on a type of tile that suits your style—ceramic, mosaic, or even peel-and-stick options. The right choice can set the tone for your kitchen.
- Prepare the Surface: Before you lay any tiles, turn off the electrical breaker and remove outlets. Scuff the walls to guarantee a strong bond with the mortar. Make sure to double-check that all electrical components are safely handled before proceeding.
- Install the Tiles: Mix and apply mortar according to the instructions. Start placing your tiles along the marked lines, using tile spacers to maintain even gaps. Don't forget to cut tiles as needed, especially around outlets.
- Finish with Grout: Once the tiles are set, mix your grout colors and fill in the gaps. Wipe away any excess with a sponge for a clean finish.
Refreshing your kitchen backsplash doesn't have to be overwhelming. By carefully planning your tile selection and grout colors, you can create a stunning visual impact in your cooking space.
Plus, it's a rewarding DIY project that will give your kitchen a fresh look and feel. So gather your materials and tools, and get started on this fun weekend project!
Upgrade Flooring With Peel and Stick Tiles

After enhancing your kitchen with a stylish backsplash, it's time to give your flooring a fresh look as well. Upgrading your flooring with peel and stick tiles is a quick and budget-friendly way to transform your space. Here are some essential tile installation tips to get you started.
| Step | Details |
|---|---|
| Preparation | Clean the floor, making sure it's smooth and level. |
| Measuring & Layout | Measure the room, mark the pattern, and identify the center. |
| Installing the Tiles | Peel the backing, press down firmly, and use a roller for even pressure. |
| Cutting & Finishing | Measure and cut tiles as needed, leaving a gap for expansion. |
| Clean Up & Maintenance | Keep the area tidy and follow proper flooring maintenance advice. |
Start by cleaning your floor thoroughly to remove dust and debris. Make certain the surface is level and dry, filling in any holes. Once that's done, measure your room and use chalk lines to mark where your tiles will go. Start from the center for an even layout. Remember that peel and stick tiles are suitable for various spaces such as kitchens, bathrooms, and entryways.
When installing, peel the backing off each tile and press it down tightly. Use a roller to confirm a strong bond. If you need to cut tiles, simply measure, score, and snap them along the marked lines. Finally, remember to leave a small gap at the baseboard for expansion.
With these steps, your new flooring will not only look great but also stand the test of time!
Create a Gallery Wall
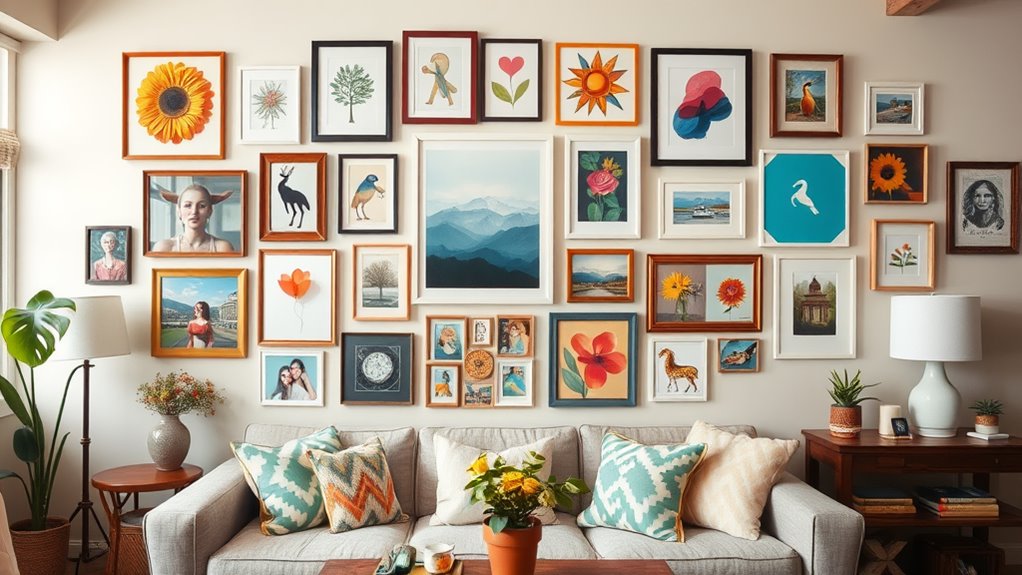
Creating a gallery wall can instantly elevate your home's decor, adding personality and style to any room. It's a fun project that lets you showcase your favorite art pieces and photos. Follow these steps to create your perfect gallery wall:
1. Choose the Right Wall: Select a spacious wall that's free from distractions. Consider areas where you spend the most time, like your living room or a staircase. Make sure the wall can accommodate multiple frames for a cohesive look.
2. Plan Your Layout: Measure the wall and sketch out your design. Use painter's tape to outline the frame placements on the wall. This will help you visualize the layout and make adjustments before hanging anything.
Don't forget to mix different frame styles for added interest!
3. Frame Selection: Choose a variety of frame sizes and orientations. Aim for a cohesive color palette to tie everything together. Whether you prefer minimalist black frames or colorful options, make sure they complement your space.
4. Hang and Secure: Start hanging the largest piece first, as it often serves as the focal point. Use a level to keep everything aligned. To prevent any accidents, apply earthquake putty to the corners of frames for extra stability.
Frame Your Bathroom Mirrors

Framing your bathroom mirrors can transform a simple fixture into a stunning focal point that enhances the overall aesthetic of your space.
Whether you prefer modern or rustic mirror styles, adding a frame can elevate the look considerably. Let's explore how you can create this DIY project with ease.
Start by gathering your materials. You'll need wood pieces of your choice, such as 1×3 boards, trim, or baseboard. A miter saw will become your best friend as it allows you to cut those wood pieces at 45-degree angles, ensuring a seamless corner fit.
Measure your vanity mirror's length and width carefully, and double-check your cuts for accuracy.
Next, assemble the frame. Use construction adhesive to bond the wood pieces together, and secure them with clamps or tape.
Don't forget to notch out wood for mirror clips if necessary, to achieve a flush fit. Fill any gaps at the mitered corners with caulk and wipe off any excess for a clean finish.
Once assembled, it's time to choose your finish. Stain or paint the frame materials to match your bathroom decor, ensuring to cover both sides to prevent raw wood from reflecting.
Finally, attach the frame to the mirror using command strips or additional construction adhesive. Allow the adhesive to dry completely before making any adjustments.
With this simple project, your bathroom mirrors won't only look fantastic but also reflect your personal style!
Build a Garden Arbor

Building a garden arbor can add charm and character to your outdoor space, creating a perfect spot for relaxation or entertaining. To get started, consider these key steps:
- Material Selection: Choose durable materials like cedar, redwood, or pressure-treated lumber for rot resistance. Alternatively, metals like steel or aluminum provide a low-maintenance option.
- Site Preparation: Mark your area with stakes and string to guarantee level space planning. Dig post holes at least 2 feet deep to establish a stable foundation. Fill with gravel for drainage, then secure with concrete for post installation.
- Frame Assembly: Construct the frame using 4×4 posts and 2x4s, guaranteeing the structure maintains its square shape for proper structural integrity. Attach horizontal beams and add rafters for additional support.
- Finishing Touches: Decorate the top with lattice or other decorative elements, giving your arbor a unique flair that enhances garden aesthetics. Confirm everything is level before filling postholes with sand or gravel for stabilization.
Construct a Bluestone Patio

After adding a charming garden arbor to your outdoor space, it's time to enhance your yard further with a stunning bluestone patio.
Start by preparing the area: excavate grass, topsoil, and debris, then grade the ground to slope slightly away from your house for proper patio drainage—aim for about 1/4 inch per foot. Spread several inches of pack material, like gravel, across the area, using a garden rake to smooth it out before compacting it with a plate compactor.
Next, create a setting bed for your bluestone. Mix seven parts stone dust with one part Portland cement, adding enough water to hydrate the mixture without making it too wet. Spread this mixture in a 1-inch thick layer to set three or four stones at a time. Make certain the setting bed is semi-rigid; this will help resist cracking while supporting your bluestone.
When laying the bluestone, start from one corner, tapping each stone into place with a rubber mallet. Check the level frequently to maintain proper drainage and ascertain stones are flush with each other.
If you're using natural bluestone pieces, fill the spaces between them with moss to add character.
Make a Unique Herb Planter

Creating a unique herb planter can greatly enhance your gardening experience while providing fresh ingredients for your kitchen. Whether you're a seasoned gardener or just starting out, there's a world of herb container designs waiting for you. Here are some ideas to spark your creativity:
- Repurposed Containers: Use old metal bins, wood boxes, or even tin cans to give your herbs a unique touch.
- Vertical Garden Ideas: Stack terracotta pots or wooden crates to save space and create a stunning wall-mounted herb garden.
- Strawberry Planters: These multi-pocket planters are perfect for growing various herbs while maximizing your vertical space.
- Self-Watering Containers: Consider using self-watering pots for herbs that need consistent moisture.
When designing your planter, make sure it's at least 30cm deep for adequate root growth. Use untreated timber, terracotta, or recycled materials to construct your planter.
If you go vertical, think about adding a drip watering system to keep your herbs thriving.
Don't forget to add decorative elements! DIY signs made from air-dry clay or displaying herbs in vintage enamel cups can add charm to your garden.
With these ideas, you can create a functional yet beautiful herb planter that not only complements your space but also supplies fresh herbs for your culinary adventures. Happy planting!
Install a Fold-Up Workbench

A well-organized workspace can make all the difference in your DIY projects, just like a unique herb planter adds charm to your garden. Installing a fold-up workbench not only enhances your workspace organization but also maximizes your tool storage.
To get started, gather a 3/4″ sheet of plywood or particle board for the worktop and select straight 2x4s for the frame to avoid alignment issues. Measure and cut all materials accurately before assembly.
Begin by adding trim around the worktop for stability. Secure a 2×4 to the edge that attaches to the wall using screws and corner braces. Pre-drill screw holes to prevent wood from splitting, then carefully align and attach the worktop to the wall. Use a level to verify everything is aligned properly.
For the legs, cut 2x4s to size and round off the top corners for smooth rotation. Drill holes for bolts and add pocket holes for stop blocks. Attach the legs to the frame using hex bolts and verify they're plumb and level before adding the stop block.
When it comes to wall mounting, locate your wall studs for secure support. Use piano hinges for a sturdy attachment of the worktop to the wall. Drill pilot holes for wall mounts, securing the workbench firmly.
Paint Your Fridge for a Fresh Look

Transforming your refrigerator with a fresh coat of paint can breathe new life into your kitchen. Not only will it look stunning, but you can also customize the fridge color to match your décor. Here's how to tackle this fun weekend project:
- Preparation and Safety: Remove all contents from your fridge and unplug it. Move it away from the wall and lay down a drop cloth to catch any drips. Make certain your workspace is well-ventilated.
- Surface Preparation: Sand the entire surface with fine grit sandpaper to guarantee the paint adheres properly. Fill in any dents or holes with wall filler, then clean the surface thoroughly.
- Priming: Apply an adhesion-promoting primer suitable for metal surfaces. Use a foam roller for larger areas and a small brush for details. Let it dry completely, and if you've got an older fridge, consider two coats of primer for better coverage.
- Painting: Choose paint types like latex or satin, avoiding matte finishes to reduce smudges. Apply at least two coats of paint, allowing 4-6 hours of drying time between each coat. You can seal the paint with a clear sealer for added durability.
With these steps, you'll transform your kitchen's focal point into a stylish statement piece. Grab your supplies and get started on this rewarding DIY project!
Frequently Asked Questions
What Tools Do I Need for Basic DIY Projects?
You might think you can build a mansion with just a spoon, but for basic DIY projects, you'll need essential tools like a tape measure, hammer, and screwdriver set.
Don't forget a cordless drill for those moments when elbow grease just won't cut it.
Regular tool maintenance is key; clean and sharpen your tools often to keep them in top shape.
Your future self will thank you when every project goes smoothly!
How Can I Safely Remove Old Wallpaper?
To safely remove old wallpaper, start by prepping the room with drop cloths and painter's tape.
You can choose from various stripping techniques, like using chemical strippers or steam.
Apply the solution or steam, wait for it to loosen the adhesive, then scrape off the wallpaper with a stripping knife.
Don't forget to wear personal protective equipment for safety and clean the walls afterward to remove any residue.
What Are the Best Paints for Outdoor Furniture?
When it comes to outdoor paint options, you want something that'll stand the test of time, like a classic rock anthem.
Look at Cuprinol Garden Shades for vibrant colors, or Ronseal Garden Paint for versatility.
For serious furniture paint durability, consider Sadolin Superdec Satin, which boasts a 10-year performance.
Always prep your surfaces well and paint in dry weather to achieve that long-lasting finish you crave for your outdoor furniture!
How Do I Maintain My DIY Projects Long-Term?
To maintain your DIY projects long-term, focus on project organization and follow essential maintenance tips.
Regularly inspect your work for wear and tear, and address any issues immediately to prevent bigger problems. Keep materials stored properly, and create a schedule for routine upkeep.
For outdoor projects, clean surfaces and protect them from the elements.
Where Can I Find Inspiration for DIY Home Projects?
You've got a world of inspiration at your fingertips! Immerse yourself in Pinterest boards filled with stunning visuals and creative ideas, or explore Instagram hashtags like #DIYproject and #CraftIdeas for trending projects.
While nature offers its own palette of colors and textures, online platforms let you discover unique techniques and materials. By combining both, you'll spark your creativity and find the perfect project that speaks to you.
Get ready to create something amazing!